

Recipe
September 16, 2009
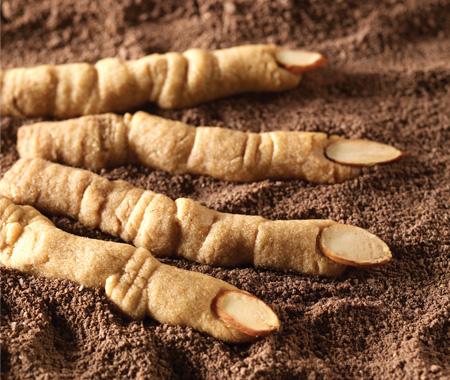
Witches’ Fingers Cookies Recipe
Step 1: Position a rack in the centre of the oven and preheat the oven to 350°F. Line two or more cookie sheets with parchment paper.
Step 2: Combine the flour, cinnamon, and salt in a small bowl. Set aside for use in Step 4.
Step 3: Place the shortening and cream cheese in the bowl of an electric mixer fitted with a paddle attachment and beat on medium speed until smooth. Gradually add the sugars and beat 1-2 minutes longer, or until light and fluffy. Add the egg yolk and extracts, and mix until well combined. Scrape down the sides of the bowl as needed to ensure even mixing.
Step 4: Turn the mixer to low speed and gradually add the dry ingredients, mixing just until combined.
Step 5: Fill a cookie press with the dough and fit the end of the press with a ?3/8″-round pastry tip. Cover any dough that is not in use with plastic wrap to keep it from drying out. (Note: Piping through a traditional pastry bag is possible, but because the dough is firm, this approach will require a lot of force. To avoid hand fatigue, a cookie press is a far better option. If you don’t own a cookie press, the dough may be hand-shaped by rolling it into cylinders and following the other shaping instructions in Step 6.)
Step 6: Press the dough onto the prepared cookie sheets into 3/8″-diameter cylinders, each about 3″ long. For the most life-like fingers, pipe the cookies no more than 2/3 the width of an actual adult finger, as the dough will spread during baking. Should the dough break while you are pressing, no worries. Simply pinch the pieces together into one finger. Remember: In this case, gnarly is better than neat. Apply varying pressure as you pipe to create wrinkled “knuckles.” If desired, score deeper wrinkles into the knuckles with a paring knife, taking care not to cut completely through the cookies.
Step 7: Press a sliced almond into one end of each cookie to make the “nail.”
Step 8: Bake 10-12 minutes, or until very lightly browned. About midway through baking, press any almonds that have shifted back into place. While the cookies are hot from the oven, gently push in the sides to make the fingers more three-dimensional. (The cookies will spread and flatten a little during baking.) Let the fingers cool on the cookie sheets until they can be easily moved without breaking, about 3-5 minutes. Carefully transfer to wire racks with an offset spatula and cool completely before storing
Makes about 72 fingers
Reprinted with permission from Julia M. Usher’s Cookie Swap: Creative Treats to Share Throughout the Year (2009 Gibbs Smith).
Directions
Yield:
Step 1: Position a rack in the centre of the oven and preheat the oven to 350°F. Line two or more cookie sheets with parchment paper.
Step 2: Combine the flour, cinnamon, and salt in a small bowl. Set aside for use in Step 4.
Step 3: Place the shortening and cream cheese in the bowl of an electric mixer fitted with a paddle attachment and beat on medium speed until smooth. Gradually add the sugars and beat 1-2 minutes longer, or until light and fluffy. Add the egg yolk and extracts, and mix until well combined. Scrape down the sides of the bowl as needed to ensure even mixing.
Step 4: Turn the mixer to low speed and gradually add the dry ingredients, mixing just until combined.
Step 5: Fill a cookie press with the dough and fit the end of the press with a ?3/8″-round pastry tip. Cover any dough that is not in use with plastic wrap to keep it from drying out. (Note: Piping through a traditional pastry bag is possible, but because the dough is firm, this approach will require a lot of force. To avoid hand fatigue, a cookie press is a far better option. If you don’t own a cookie press, the dough may be hand-shaped by rolling it into cylinders and following the other shaping instructions in Step 6.)
Step 6: Press the dough onto the prepared cookie sheets into 3/8″-diameter cylinders, each about 3″ long. For the most life-like fingers, pipe the cookies no more than 2/3 the width of an actual adult finger, as the dough will spread during baking. Should the dough break while you are pressing, no worries. Simply pinch the pieces together into one finger. Remember: In this case, gnarly is better than neat. Apply varying pressure as you pipe to create wrinkled “knuckles.” If desired, score deeper wrinkles into the knuckles with a paring knife, taking care not to cut completely through the cookies.
Step 7: Press a sliced almond into one end of each cookie to make the “nail.”
Step 8: Bake 10-12 minutes, or until very lightly browned. About midway through baking, press any almonds that have shifted back into place. While the cookies are hot from the oven, gently push in the sides to make the fingers more three-dimensional. (The cookies will spread and flatten a little during baking.) Let the fingers cool on the cookie sheets until they can be easily moved without breaking, about 3-5 minutes. Carefully transfer to wire racks with an offset spatula and cool completely before storing
Makes about 72 fingers
Reprinted with permission from Julia M. Usher’s Cookie Swap: Creative Treats to Share Throughout the Year (2009 Gibbs Smith).
Steve Adams