

Decorating & Design
September 25, 2015
DIY: Antique Mirror
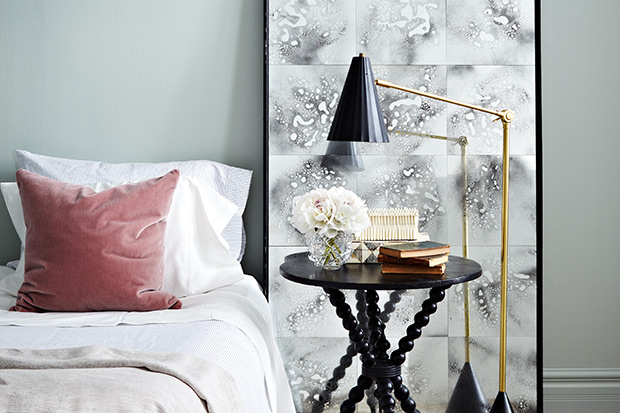
Designer Sarah Hartill shares step-by-step instructions on how to create an antique mirror.
 An antique mirror adds great character to a room. Authentic pieces, however, can be pricey, and some DIY tarnishes involve unsavory chemicals — so I came up with a method that uses spray paint to achieve an instant patina. Here’s how I did it.
Materials
You’ll need: Spray bottle, mirror tiles, spray paint, paper towels, 1⁄2″-thick MDF board, mirror adhesive, door-stop trim, decorative moulding, finishing nails, hammer, handsaw, miter box, multipurpose glue, MDF lengths.
Step 1: Antique The Mirror
Fill a spray bottle with water, lay out mirror tiles on newspaper or a drop cloth and spritz tiles with water, leaving droplets on the surface. Give each tile two mists of a dark grey or black satin spray paint that has both paint and primer in one. Use a light touch, or the paint will cover too much of the mirror. Let dry for a few minutes, then dab off the water with a paper towel.
Tip: Vary the size of your water puddles to create more natural-looking pockets of patina.
Step 2: Mount Tiles
Glue the mirror tiles to the MDF board using mirror adhesive. I used 18 12″ x 12″ tiles to cover a 72″ x 36″ board. Let set overnight. (You can also do this project with a framed mirror instead of tiles, but the water will pool over a larger area in the first step.)
Step 3: Make Frame
While the adhesive is setting, prep your frame. It has two parts: one that fits around the outside edge (to cover the edges of the MDF) and one that fits over the outer edges of the mirror tiles (to create an attractive finish). Spray-paint a length of 1⁄2″ w. x 1⁄4″ d. door-stop trim and a length of 2″ w. x 1⁄4″ d. moulding in dark grey or black satin, and let dry. Use straight cuts to cut the door-stop trim to fit around the outside edge of the MDF board, then attach the trim to the MDF with finishing nails. Use a hand saw and miter box to cut the moulding into an inner frame that will fit between the mirror and outer frame and cover any gaps. Attach each piece to the top of the mirror with multipurpose glue and let dry.
Step 4: Stabilize Mirror
When the frame is securely attached, flip the mirror over. Cut two 1″ x 2 1⁄2″ lengths of MDF slightly smaller than the mirror’s height. (I trimmed mine to about 65″.) Attach each length to the back of the mirror with the multipurpose glue, about 12″ in from the sides of the mirror. Let dry, stacking a few heavy books on top so the MDF pieces stay in place as the glue sets. These supports will keep the mirror from buckling when it’s standing upright.
Watch the mirror come to life in our step-by-step video here.
Angus Fergusson
Spray paint, MDF, mirror adhesive, trim, moulding, nails, hammer, glue, The Home Depot; bedding, Coyuchi; pillow, rug, Elte; side table, Kantelberg & Co.; lamp, boxes, vase, L’Atelier; wall colour, Light Blue (22), Farrow & Ball.
House & Home March 2013