

DIY Projects
February 5, 2014
DIY Custom Letters
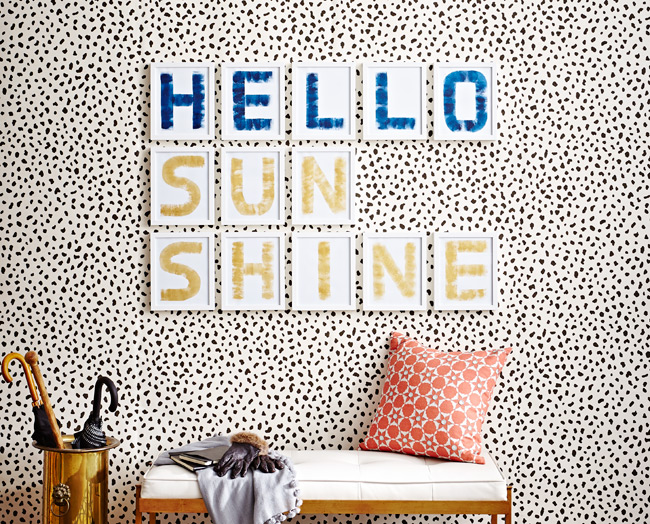
Finding just the right artwork for a space can be tricky and expensive. But it’s a bit sad to leave the walls bare while you wait for that perfect piece, so Sally Armstrong filled hers with letter art. It takes just a few hours to make, covers a large area and can be customized with a favourite phrase or a colour pulled from your decor. (Plus, her kids love it!)
Materials & Tools
- Mixed-media paper
- Picture frames
- Utility knife
- Acrylic paint
- Plastic tray
- 2 1?2″ foam paint roller
Step 1. Choose phrase, paint and frames. Your phrase should be long enough to make a statement on the wall, but no longer than about 20 letters. Pick paint colours that match a fabric, wallpaper or rug in the space and fit the phrase. Buy one frame for each letter.
Step 2. Remove the backing paper or mat from the frame and trace its outline on the mixed-media paper. (If your frame didn’t come with backing paper, simply measure its dimensions out on the mixed-media paper.) Trim paper to fit inside the frames with a utility knife, with one sheet for each frame.
Step 3. Squirt paint onto a plastic tray. Roll the foam paint roller in the paint and dab off the excess. Paint one letter onto each sheet of trimmed paper. Let the paint dry for about an hour.
Step 4. Secure each sheet in a picture frame. Hang the frames fairly close together, so the phrase is easy to read, and enjoy.
Mixed media paper, foam roller, paint, DeSerres; frames, Ikea; bench Elte; wallpaper, Thibault.
Get more DIY & Home Improvement ideas in our guide.