

Decorating & Design
Deck the Halls: Spark Joy With These Fun and Festive Holiday Crafts
Published on December 9, 2025
Make your home even merrier this holiday season with these 14 festive crafts. From DIY pine snowflakes to homemade Hanukkah envelopes, these fun projects are sure to inspire and delight.
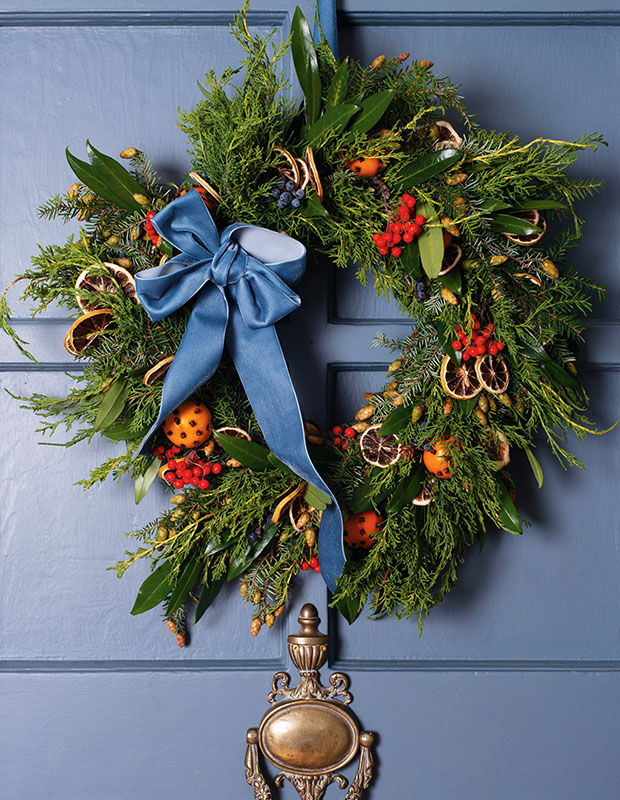
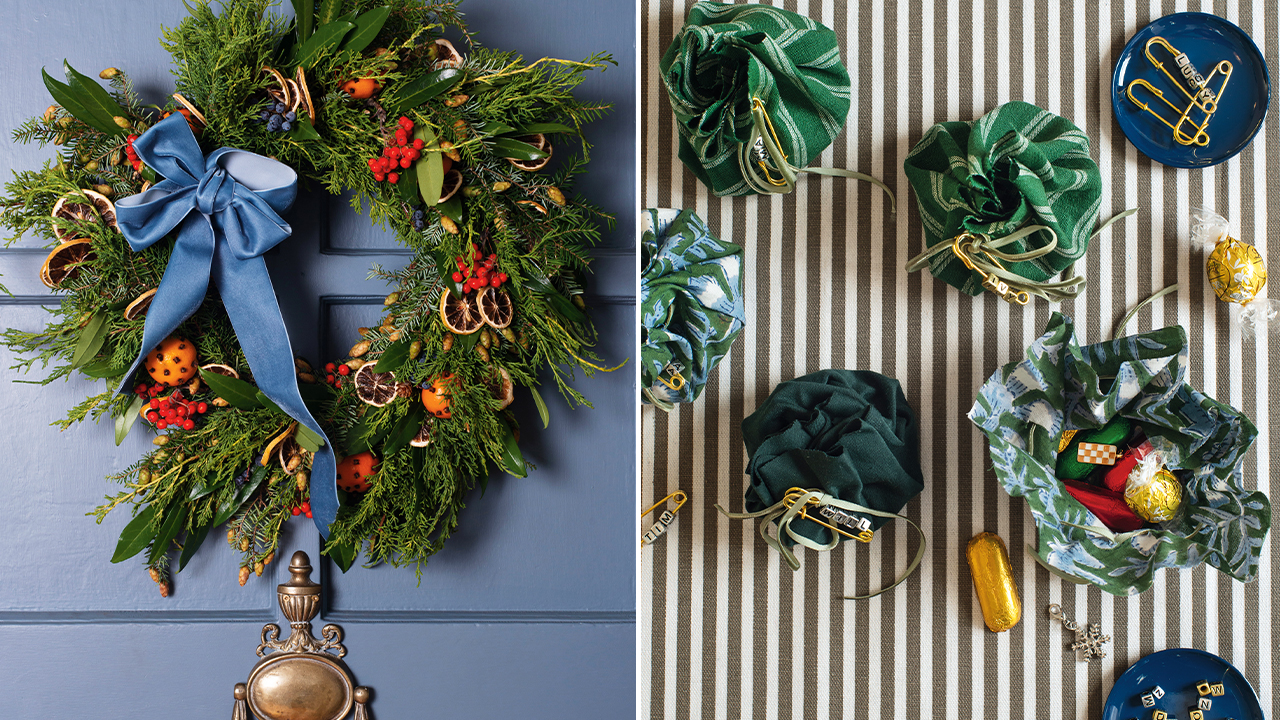
Citrus Wreath
Fresh and fragrant, this wreath can live indoors or out.
What You’ll Need:
- Floral wire
- 18″ wire wreath form
- Branches of western hemlock, juniper sprigs and laurel leaves
- Snippers
- Berries
- Dried orange slices
- Whole mandarins or clementines
- Whole cloves
- Wired wood picks
- Velvet ribbon with wired edges
Wrap floral wire 3 times around a wreath form. Overlap the wire so it’s firmly attached, but don’t cut it. Gather greenery into small bundles. Using the wire, tie 1 bundle at a time to the wreath form, wrapping it tightly. Repeat, angling greenery the opposite way. Continue adding bundles to create fullness. Cut a length of floral wire and wrap it around the wreath form 3 times to secure everything. Wire in berries and dried orange slices. Stud small oranges with cloves, then attach them using wired wood picks. Add a double bow for a finishing touch.
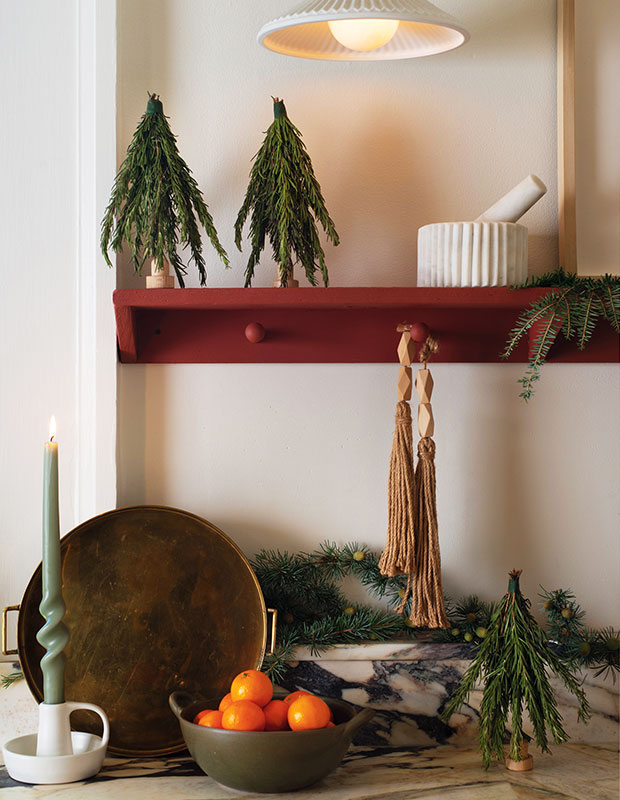
Rosemary Mini Trees
Small and aromatic; great for shelves.
What You’ll Need:
- Wooden skewers
- Corks with flat bottoms
- Rosemary sprigs
- Floral wire
- Tacky putty
Pierce the sharp end of a wooden skewer through the middle of a cork. Bundle 14 sprigs of rosemary of differing lengths. Using wire, tie the ends of the rosemary together, then arrange the rosemary over the tip of the skewer with the wired ends at the top. Trim to create the shape of a small evergreen tree. Add tacky putty underneath the cork to hold it in place.
Read more: 10+ magical Christmas trees to inspire your holiday decorating
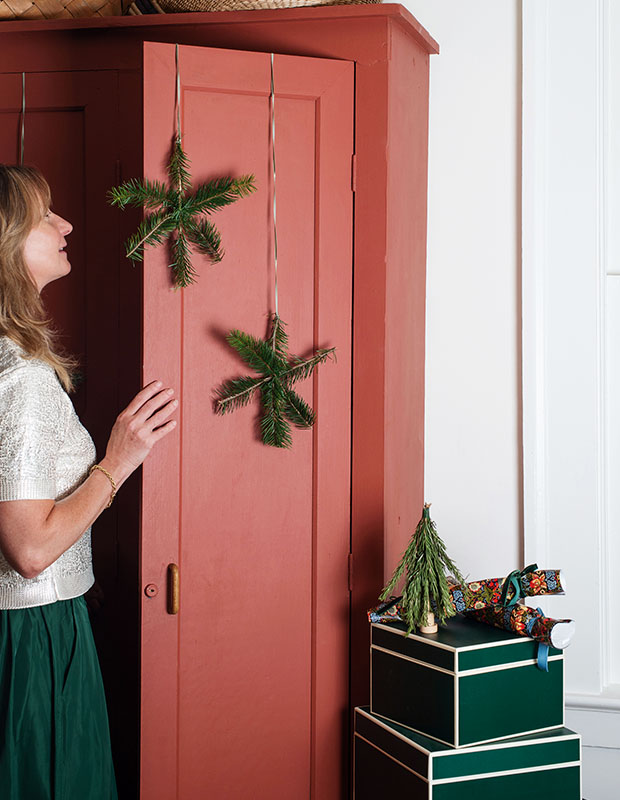
Pine Snowflakes
These are easy to make and look great hung on cabinet doors or window frames.
What You’ll Need:
- Pruners
- Pine branches
- Floral wire
- Ribbon
Cut the pine branches into lengths ranging from 6″ to 10″. Place 1 of the longer branches down, then criss-cross 2 slightly smaller branches over top of it. Wire all 3 branches together in the centre. Gently manipulate to achieve a snowflake look. Attach a piece of ribbon to 1 end of the longest pine branch and hang.
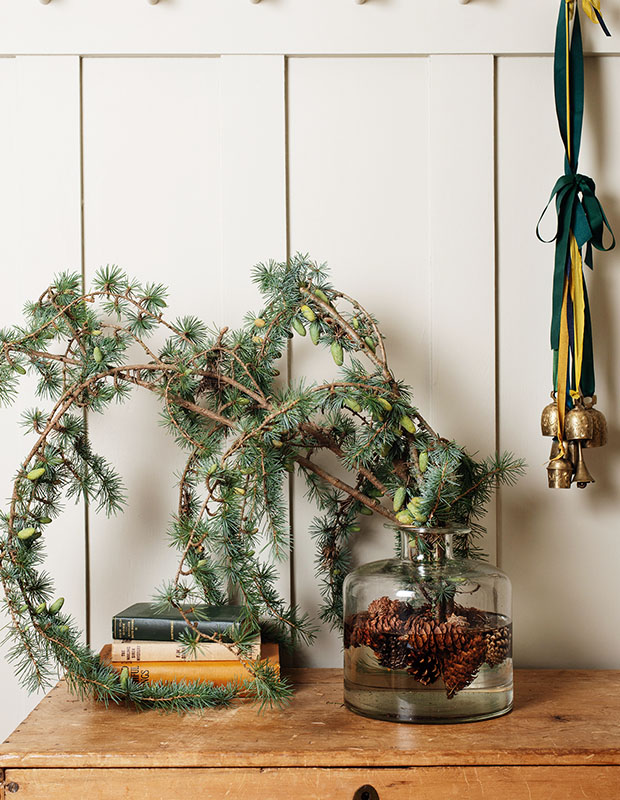
Bonsai Branch Arrangement
Fill a vase with water, pinecones and a beautifully shaped branch to create an all-natural holiday arrangement. Change the water frequently.
What You’ll Need:
- Vase
- Pinecones
- Evergreen branch
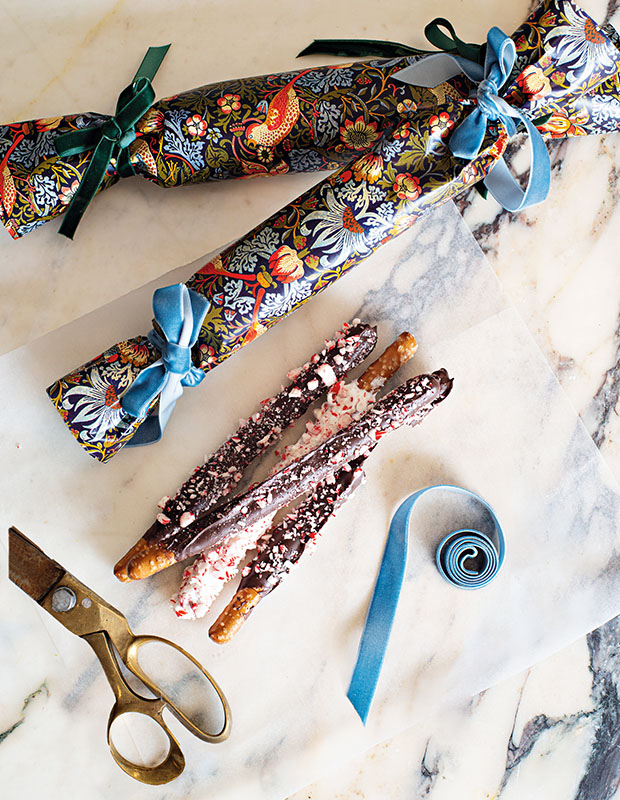
Chocolate Peppermint Pretzel Crackers
Great as table favours or hostess gifts.
What You’ll Need:
- Candy canes
- Resealable bag
- Rolling pin
- Chocolate melting wafers
- Tall narrow jar
- Long pretzels
- Cooling rack
- Parchment paper
- Tape
- Gift wrap
- Ribbon
Crush candy canes in a plastic bag. Melt chocolate and pour into a glass jar. Dip the pretzels into the chocolate to coat. Remove and sprinkle with crushed candy canes. Place on rack to cool. Roll pretzel rods in a piece of parchment paper and secure with tape. Cut a piece of gift wrap about 6″ longer in width than the long pretzels. Lay wrapped pretzels inside and roll up and tape. Pinch the paper on both ends and tie off with ribbons.
Related: How to bring an artful look to your holiday table settings
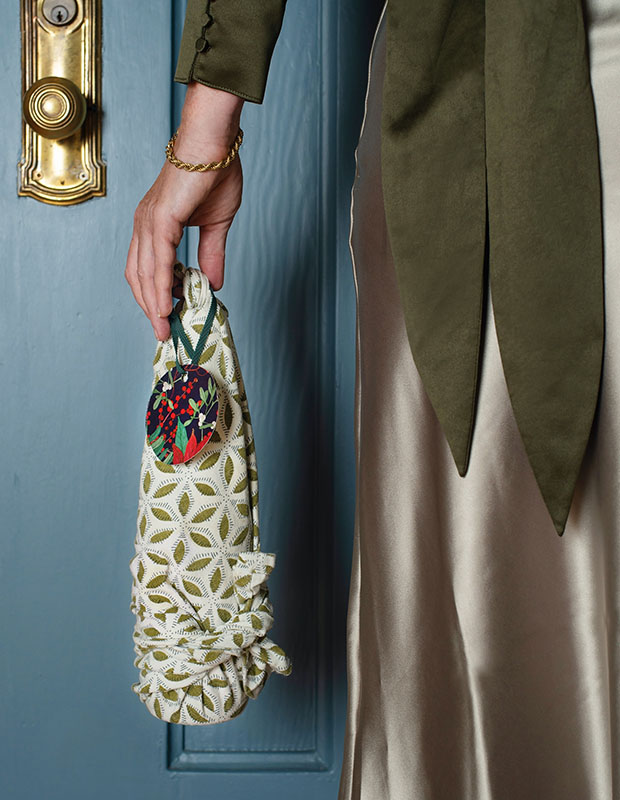
Napkin–Wrapped Wine Bottle
An easy gift wrap idea.
What You’ll Need:
- 20″ x 20″ hemmed cloth square (a new napkin or dish towel also works and makes a good gift)
- Gift tag
- Ribbon
Lay the napkin face down on your work surface and place a wine bottle upright, in the centre. Pull opposite corners of the napkin up around the top of the bottle and tie a double knot. Grab the 2 remaining corners of the napkin and wrap them around the bottle, criss-crossing each around the opposite side, and tying them together with a double knot or bow. Attach a gift tag with a ribbon to the top knot.
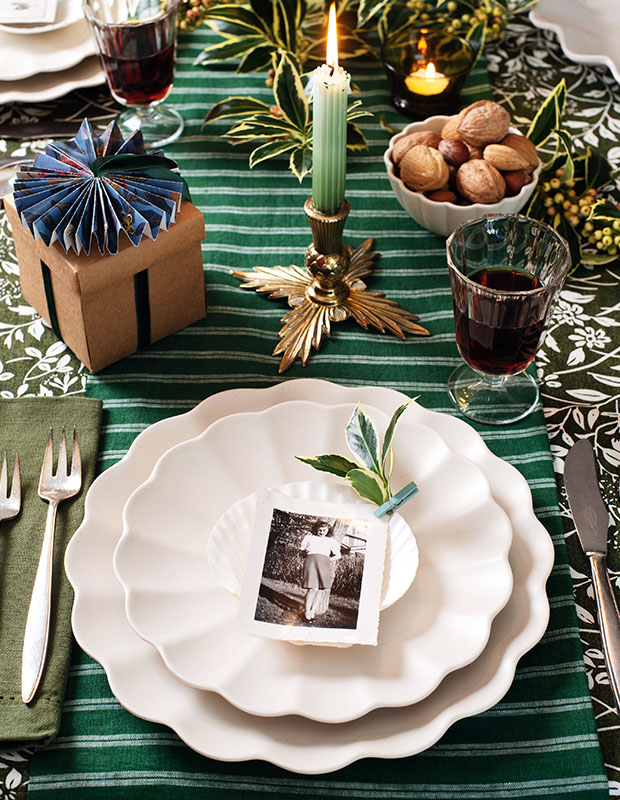
Photo Placecard
Old photos of your guests or new Polaroids make fun placecards.
What You’ll Need:
- Photos
- Napkins or scallop shells
- Small clothespins
- Greenery
- Polaroid camera (optional)

Holiday Card Display
Receiving holiday cards from friends and family is one of life’s many pleasures — display them!
What You’ll Need:
- Wide-mouthed vase
- 6 to 8 branches
- Hole punch
- Holiday cards
- Ribbon
- 1 large ribbon
Place branches in a vase and let them fan out in all directions. Punch a hole in the centre of each card, then thread a 5″ length of ribbon through the hole and tie a knot so you can hang the card. Tie a large ribbon around the vase and place it on a tray with bowls of clementines, nuts and chocolates.
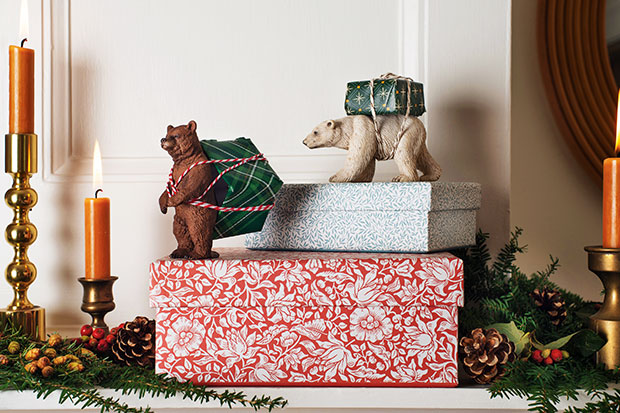
Animal Figurine–Wrapped Gifts
A playful way to put smaller presents or gift cards on display.
What You’ll Need:
- Small wrapped gift
- Twine or string
- Animal figurines (find these through Schleich)
Wrap your gift as usual, then attach it to the back of an animal figurine with twine. Arrange your completed presents around the mantel for a fun twist at your gift exchange.
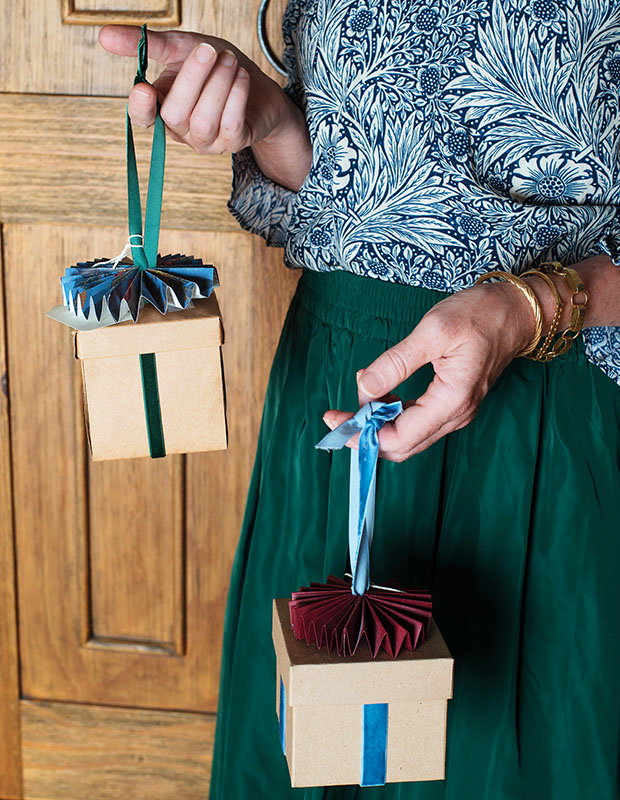
Small Gift Ornaments
Turn small gifts into ornaments you can hang on the tree.
What You’ll Need:
- Double-sided tape
- Ribbon
- Cardboard box
- Utility knife or scissors
- Fan decoration (optional)
- Gift tag
Using double-sided tape and ribbon, decorate the box, then place a gift inside. Take the lid and, with a utility knife, pierce 2 small holes into it. Thread a 12″ length of ribbon through the holes to make a handle. Flip the lid over and tie a knot. Using double-sided tape along the inside edges of the lid, secure the lid to the box and add a gift tag.
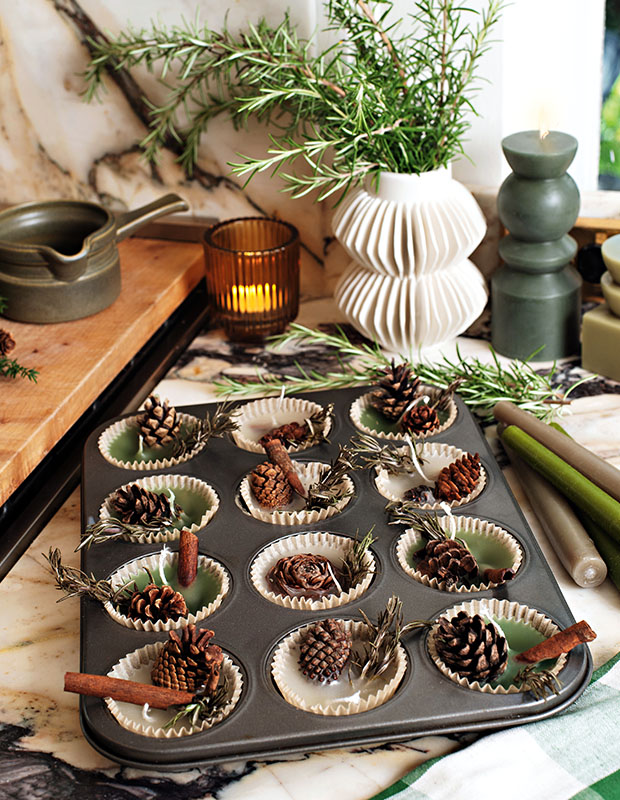
Wax Fire Starters
Craft a fire starter that will make your home smell like the holidays.
What You’ll Need:
- Muffin liners
- Muffin tray
- Cinnamon sticks
- Rosemary sprigs
- Candlewicks
- Pinecones
- Crafting saucepan
- Candle ends or blocks of candle wax
Place liners into the muffin tray. Trim cinnamon sticks and rosemary branches and cut off the metal tab on the candlewicks. Fill each liner with a pinecone, cinnamon stick, sprig of rosemary and wick. In a saucepan or double boiler, melt down candle wax. Once melted, carefully pour hot wax into each muffin liner, until about ¾” full. Cool overnight. To help ignite your kindling, set the fire starter in the bottom of your fireplace and light the wick.
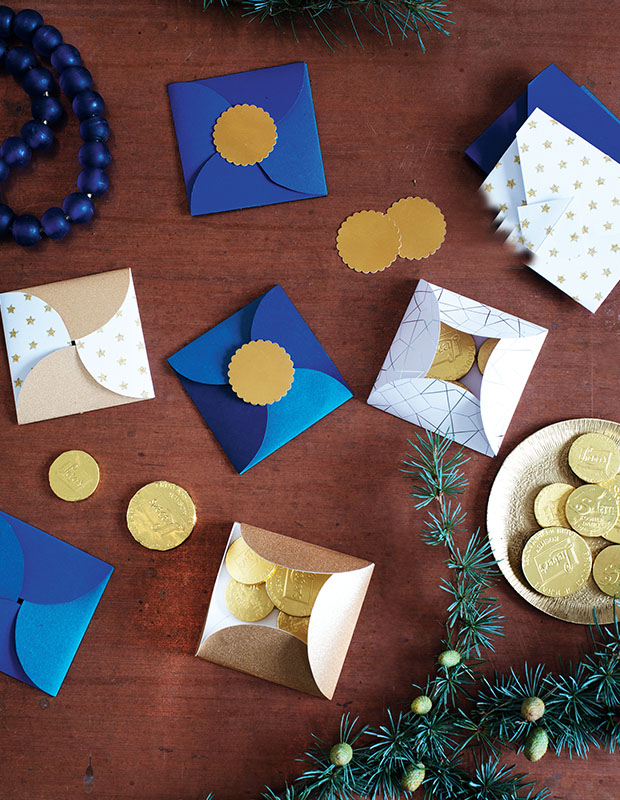
Hanukkah Envelopes
Fill these envelopes with chocolate gelt, money or gift cards and seal them with golden adhesive stickers.
What You’ll Need:
- 4″ to 6″ round plate
- Pencil
- Cardstock
- Scissors
- Glue stick
- Adhesive golden seals
Using a plate, trace 2 circles on a piece of cardstock. Repeat on a second piece of cardstock with a different pattern or colour. Cut out each circle and fold each in half to create a seam. Stack the circles, alternating patterns or colours. Fan out the circles so that the fold lines form a square. The overlapping pieces should make a pinwheel shape in the centre of the square. 1 at a time, lift the overlapping edges of the circles and glue them together. Repeat on the reverse side. To close the envelope, fold down the top half-circle and repeat with the other 3 flaps. Gently tuck 1 side of the last half-circle under the first circle and top with a seal.
Read more: Designer Gillian Segal decorates her home for Hanukkah
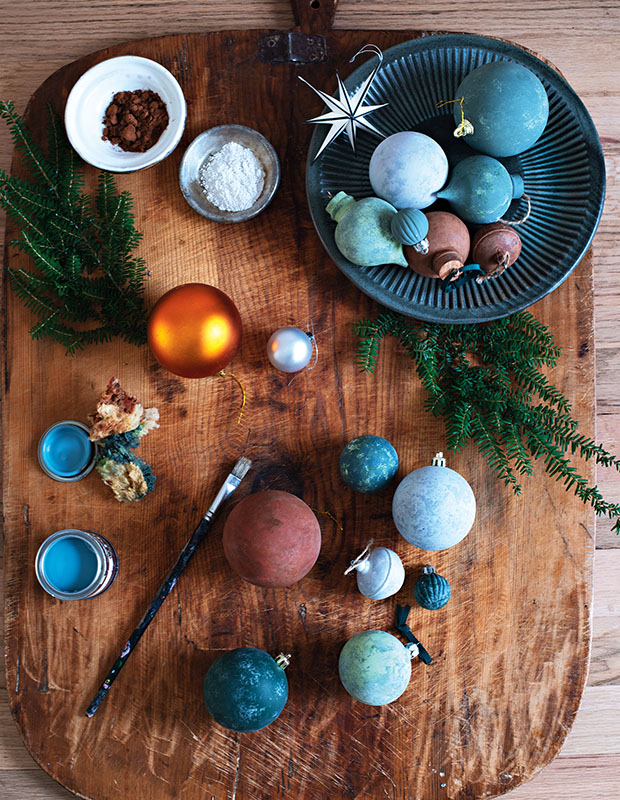
Recycled Matte Ornaments
Breathe new life into your old ornaments.
What You’ll Need:
- Paper plates
- Dark and light shades of craft paint or leftover latex paint that will adhere
- Cocoa powder
- Plaster of paris powder
- Baking sheet
- Parchment paper
- Paintbrush
- Old ornaments
- Paint sponges
Pour the paint and powders onto separate paper plates and line a baking sheet with parchment paper. Using a paintbrush, apply a coat of dark or light paint onto the ornament and let it dry. Then, take a paint sponge and dab on the other colour of paint in a random pattern, but don’t completely cover up the first layer. Working quickly, dip the ornament into 1 of the powders and let it dry (cocoa powder for warmer colours and plaster of paris for cooler hues). When dry, use a clean paintbrush to dust off loose powder. String the ornaments with ribbon and hang on your tree!
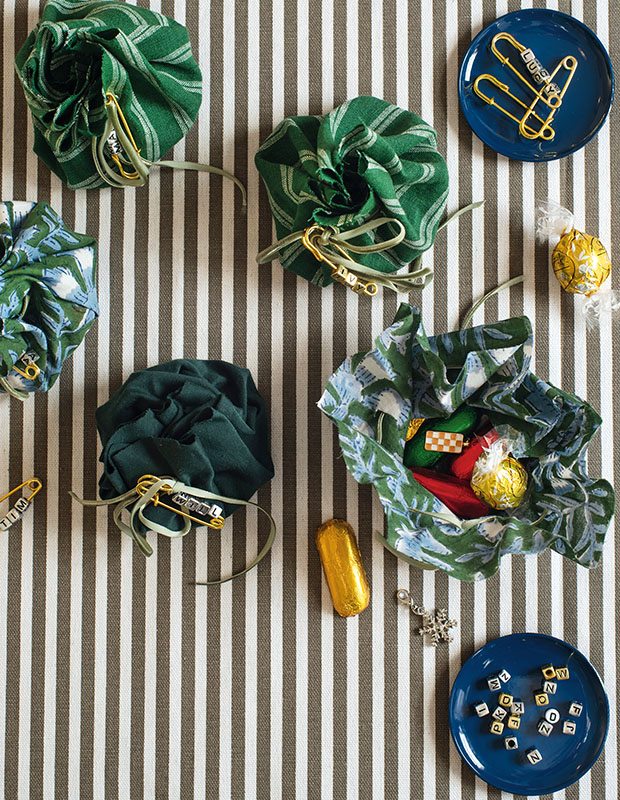
Party Favour Pouches
Fill these fabric pouches with small treats for your holiday table — no sewing required!
What You’ll Need:
- Dinner plate
- Pencil
- Fabric
- Scissors
- Utility knife
- Thin ribbon
- Letter beads
- Golden kilt pins
- Charms or treats
Using a plate, trace a circle on the fabric, then cut it out with scissors. About 1″ from the outside of the circle, use a utility knife to make small x-shaped incisions into the fabric around the full circumference, about 1″ apart. Weave ribbon in and out of the holes, leaving excess to tie the ends together. Thread letter beads onto a kilt pin to spell out a name, then fasten the pin to the pouch. Fill the pouch with goodies, cinch the fabric closed with the ribbon and tie into a bow.
Array