menu
  • Contests
  • My H&H
  • eNewsletter
  • Maison & Demeure
  • Magazine
  • SUBSCRIBE

    SUBSCRIBE TODAY!

    • Subscribe
    • Give a Gift
    • Renew
    • Digital Magazine
    • eNewsletter
    • Customer Service
    • Back issues
    • Find H&H in stores
    • Current issue
  • Videos

    SUBSCRIBE TODAY!

    • Design News
    • DIY Projects
    • Cooking
    • Home Tours
    • Cottages & Country
    • Condos & Lofts
    • Outdoor
    • Kitchens & Bathrooms
    • Makeovers
  • Rooms

    SUBSCRIBE TODAY!

    • Basements
    • Bathrooms
    • Bedrooms
    • Dining Room
    • Entryways & Mudrooms
    • Hallways & Stairs
    • Kids’ Rooms
    • Kitchens
    • Laundry Rooms
    • Living Rooms
    • Offices & Workspaces
    • Outdoor
  • Decorating & Design

    SUBSCRIBE TODAY!

    • Best Paint Colors
    • Celebrity Style
    • Condos
    • Decorating Advice
    • DIY Projects
    • Home Tours
    • News & Events
    • Organization
    • Products We Love
    • Real Estate
    • Small Spaces
  • Food

    SUBSCRIBE TODAY!

    • Entertaining
    • Recipes
    • What We’re Eating Now
    • Experts
    • Galleries
    • shh
    menu
    • H&H TV + VIDEOS
      • Home Tours
      • Makeovers
      • DIY Projects
      • Design News
      • Cooking
      • Featured Personalities
      • Condos & Lofts
      • Cottages & Country
      • Kitchens & Bathrooms
      • Outdoor
      • All Videos
      Home Tours
      Makeovers
      DIY Projects
      Design News
      Cooking
      Condos & Lofts
      Cottages & Country
      Kitchens & Bathrooms
      Outdoor
      All Videos
    • Rooms
      • Kitchens
      • Bathrooms
      • Living Rooms
      • Kids’ Rooms
      • Dining Room
      • Bedrooms
      • Basements
      • Laundry Rooms
      • Offices & Workspaces
      • Entryways & Mudrooms
      • Hallways & Stairs
      • Outdoor
      Living Rooms
      Kids' Rooms
      Dining Room
      Bedrooms
      Basements
      Laundry Rooms
      Offices & Workspaces
      Entryways & Mudrooms
      Hallways & Stairs
      Outdoor
    • Decorating & Design
      • Home Tours
      • Decorating Advice
      • Best Paint Colors
      • Small Spaces
      • Products We Love
      • News & Events
      • DIY Projects
      • Organization
      • Celebrity Style
      • Condos
      • Real Estate
      Home Tours
      Decorating Advice
      Small Spaces
      News & Events
      DIY Projects
      Organization
      Celebrity Style
      Condos
      Real Estate
    • Food
      • Recipes
      • Entertaining
      • What We’re Eating Now
      Recipes
      Entertaining
      What We're Eating Now
    • Experts
      Lynda Reeves
      Beth Hitchcock
      Meg Crossley
      Stacey Smithers
      Morgan Michener
      Joel Bray
      Kai Ethier
      Lauren Petroff
      Jennifer Koper
      Reiko Caron
      Kristen Eppich
    • Galleries
    • shh

    DIY Projects | Decorating & Design

    February 16 2017

    DIY: Bookshelf Hack

    • Save This
    • Print This
    • Comment

    Senior editor Sally Armstrong dresses up plain bookshelves with rolls of wood-veneer trim. 

    DesignEd_Stock_2014_Sally_0051
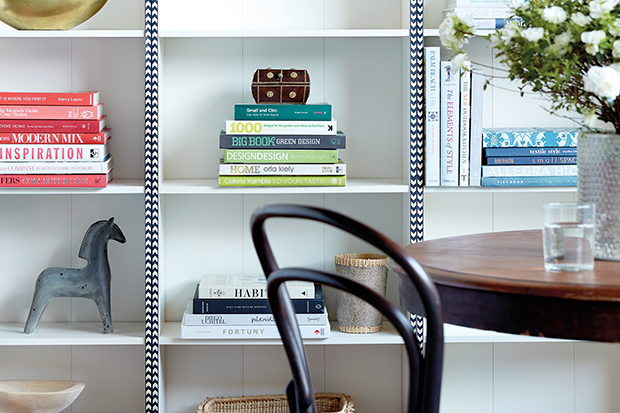
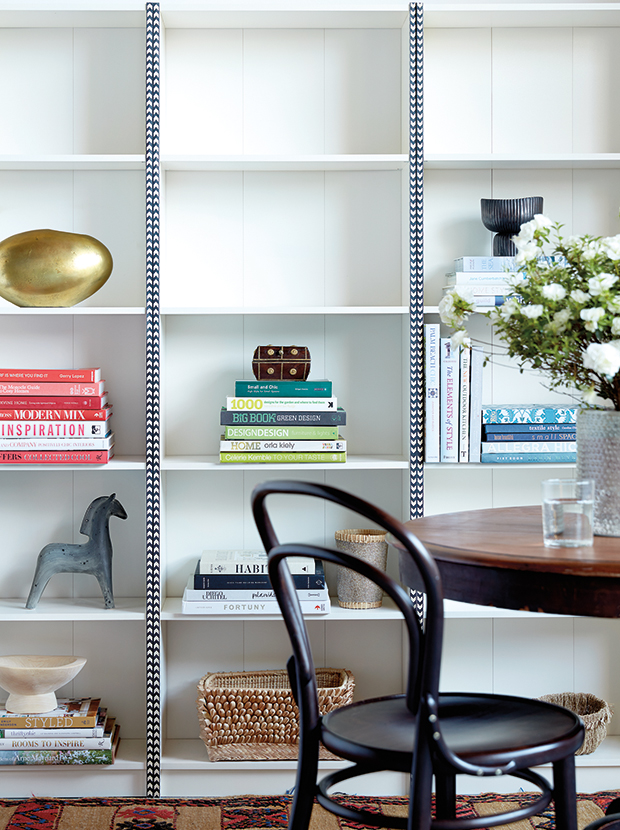
Has your bookshelf felt more drab than fab lately? Even the simplest unit deserves a dash of personal style — and decorative wood trim is an easy way to do it. I looked in a few different retailers before finding this arrow-patterned trim, but there are plenty of options out there. Applying it to the edges of the shelves was a subtle change, but one that had a big impact on the space with minimal effort.

    8-2016_OCT_EDDIY_BookcaseTrim-fiished-trim-shot-2


    1 of 8
    Materials
    1 of 8
    Step 1: Measure For Length Of Veneer Trim
    1 of 8
    Step 2: Apply Glue
    1 of 8
    Step 3: Apply Trim
    1 of 8
    Step 4: Apply Wooden Strip
    1 of 8
    Step 5: Remove Wooden Strip
    1 of 8
    Step 6: Let Trim Dry Completely
    1 of 8
    1 of 8
    Up Next

    10 Foolproof Ways To Update An Aging Home

    View Gallery
    Materials

    You’ll need wood-veneer trim (wooden banding), utility knife, cutting mat, cabinetmaker’s glue (or other wood glue), binding tape (or other strong tape), and wood strips.

    Step 1: Measure For Length Of Veneer Trim

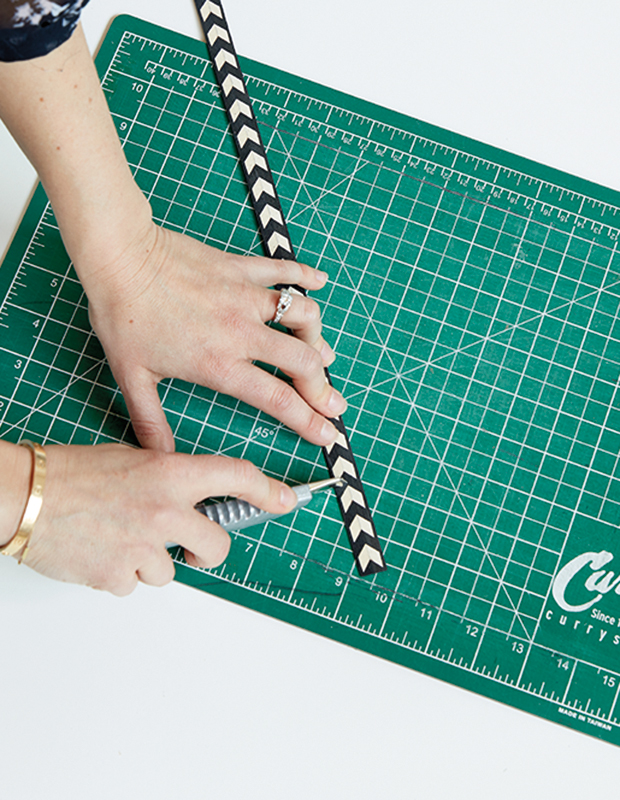
    Measure the front edges of your bookshelf’s gables (vertical boards) to determine the amount of trim needed. The banding I used was from Lee Valley and came in lengths of 1 meter; I used just under 2 meters per edge. Mark these measurements on your banding and cut to size using a utility knife.

    Step 2: Apply Glue

    Apply cabinetmaker’s glue down the center of a shelf edge; use sparingly so that excess glue doesn’t push out the sides of the banding.

    Step 3: Apply Trim

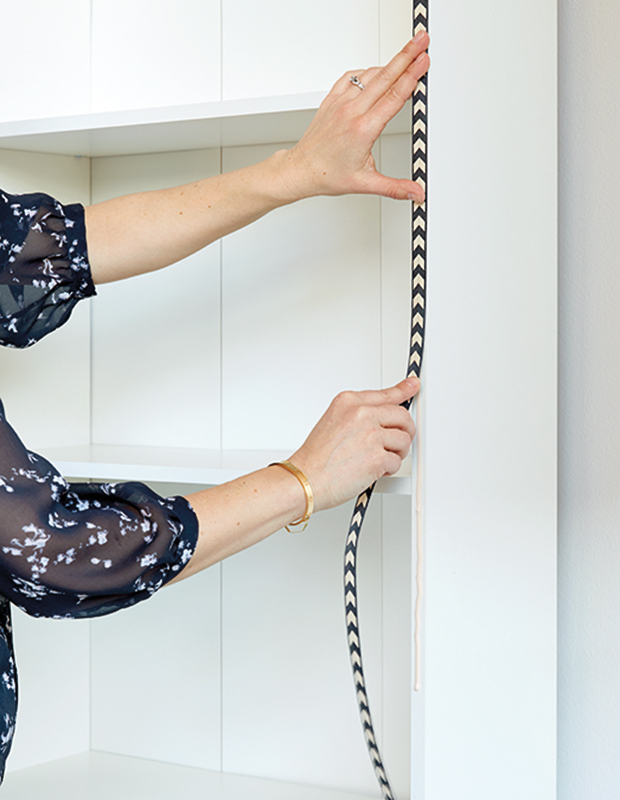
    Press the decorative trim onto the shelf edge, being careful to ensure that it’s applied evenly so that it doesn’t bunch. (If you don’t want to permanently commit to the banding, consider installing it with double-sided tape rather than glue.)

    Step 4: Apply Wooden Strip

    Lay a wooden strip that’s the same length and width as your shelf edge (you can get one cut at The Home Depot) over the trim and tape it tightly to the shelf using binding tape. This will maintain pressure on the trim while it dries without having to attach tape directly to the band. Leave strip on for at least 1 hour.

    Step 5: Remove Wooden Strip

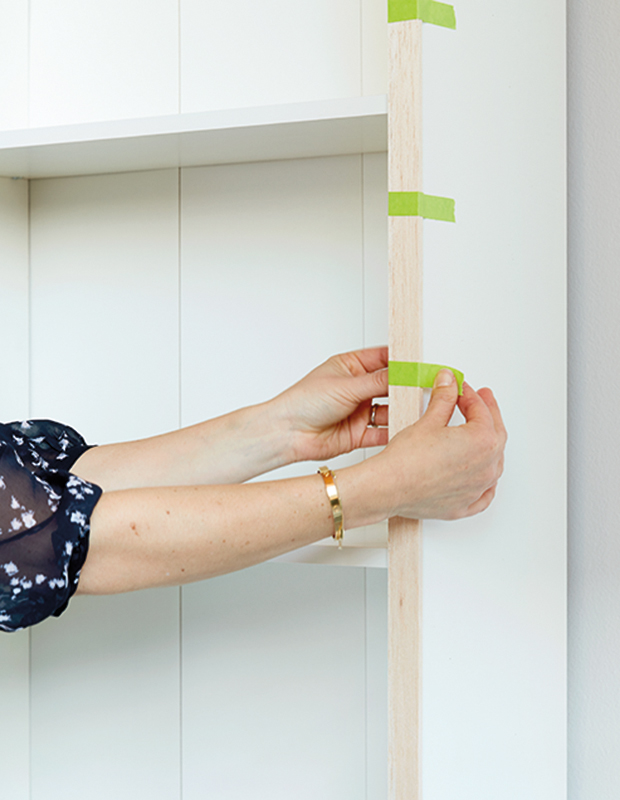
    Carefully peel off the tape to remove the wooden strip.

    Step 6: Let Trim Dry Completely

    Allow the glue holding the decorative trim to dry for another 24 hours to ensure it’s fully bonded. Fill your shelves and enjoy!

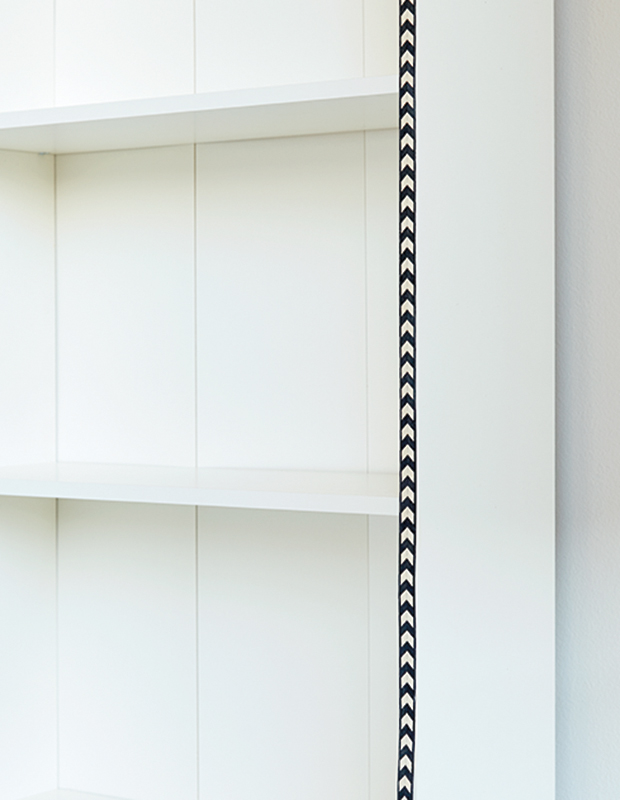
    Here’s a close-up of the finished product. I love the chevron look of this trim!

    image description
    image description
    image description
    image description
    image description
    image description
    image description
    image description

    Advertisement


    Author:
    As told to Amanda Tucci
    Photographer:
    Alex Lukey (portrait), Kim Jeffery
    Designer:
    Sally Armstrong
    Source:
    House & Home October 2016
    Tags:
    DIY Sally Armstrong
    • Pingback: blog comments design inspiration()

    Sign up for House & Home’s Free eNewsletter!

    Related Galleries

    • DIY Customized Photo Chair

      DIY: Personalized Picture Chair

      • Decorating & Design
      • DIY Projects
    • DIY: Colorful Canvas Storage Bins

      • Decorating & Design
      • DIY Projects
    • Photo Gallery: Editors’ 2013 Must-Haves

    • Rooms
    • Decorating & Design
    • Food
    • Experts
    • H&H TV
    • About Us
    • Contests
    • Maison & Demeure
    • Twitter
    • Facebook
    • Pinterest
    • eNewsletter
    • Subscribe
    • Renew
    • Give A Gift
    • Digital Magazine
    • Customer Care
    • Make a Payment
    • Back Issues
    • Advertise With Us
    • Media Kit
    • Privacy Policy
    • Terms Of Use
    • Contact Us
    House & Home
     

    Copyright © 2019 House & Home Media. All rights reserved.

    Home » Photo Gallery: Editors’ 2013 Must-Haves