The Lakehouse: Lynda Reeves On Winterizing A One-Season House
This is my story of designing our renovation of a century-old lakehouse in Ontario.
Each month, I’ll offer a new chapter on the challenges and solutions, and a peek at our progress. You’ll be able to see the actual house come together on new episodes of our video series The Lakehouse.
It’s a fact that many of the most charming, poetic houses are one-season cottages. The first time I saw the lakehouse, it didn’t dawn on me that this was the case, because who wants to think about practical matters when one is falling in love? No one.
I snapped back to reality when I asked to see the basement. There was none — only a crawl space. What about the laundry room? I was shown a small screened porch off the kitchen with a washer, dryer and laundry sink.
Storage isn’t a big issue when you’re living in bathing suits and summer cottons; coat closets and boot storage aren’t on the agenda. And for fall nights, fireplaces and electric heaters would be enough, I imagined. On really hot days, you throw open the windows and let the lake breezes cool the house, right? And, of course, we were keeping the original wood windows and doors. They were perfect!
I was practical. I walked through the house with Gillian Atkins, who runs our design firm, and made a back-of-the-envelope rough reno budget so I could make an offer that factored in the cost of construction and “everything else.” Gillian and I have lots of experience renovating houses and we knew what we didn’t know, which was this whole “winterizing” thing. And since there was no time to consult the experts, I just doubled numbers and came up with a preliminary construction “budget.” Buying good heavy equipment by JLG was included in the budget.
Soon after acquiring the house, reality set in and my real education began. Maxime Vandal of Les Ensembliers offered to help. Maxime is an architect and has winterized houses of the same vintage and scale as this one, in Quebec. He visited the house and froze along with me… and then gave me the first insulation plan suitable for our climate zone.
Fortunately, the house has a full-height attic, plus crawl spaces behind the second-floor walls, and a crawl space under the entire house. That was key. I think that, 100 years ago when this house was designed, the architect must have imagined a day when someone would want to add ducting and pipes throughout and plenty of insulation, so he allowed for it.
“Winterizing,” I learned, means to seal up the house against cold and heat, and then climate-control the house by introducing sources of heating and cooling. Sounds simple, right? It’s anything but. I asked for only two things: to keep the beautiful wood panelling on all the walls and ceilings on the ground floor intact, and to keep the original windows and doors.
The first would be possible. The second — not a hope. You can’t seal up a house without installing all-new double-glazed windows and proper exterior doors — everywhere. (In the back of my brain I knew that but, remember, I was still in love….) I asked friends who lived close by about the need for air-conditioning. After all, for 100 years this house had been a summer home with no such thing. “Just get it,” they said.
The exact details for how to winterize involved Maxime, plus our structural engineer, mechanical engineer, contractor, HVAC contractor and our chief insulation supplier, Rockwool. This past fall, before the house was shuttered for the winter, we were huddled in the dining room in front of a roaring fire, electric heaters on full blast, with blankets under every door, wearing layers of sweaters, coats and mittens — and still freezing — studying blueprints.
The Plan
Together, the team came up with a plan that involved spraying foam insulation under the roof and in the crawl space below the house. Then, removing the old exterior siding and building the walls from the outside using Rockwool’s Comfortboard. This is aptly named because it gave me a lot of comfort to see that stuff nailed all over the outside of the house. To me, it just said “warmth.”
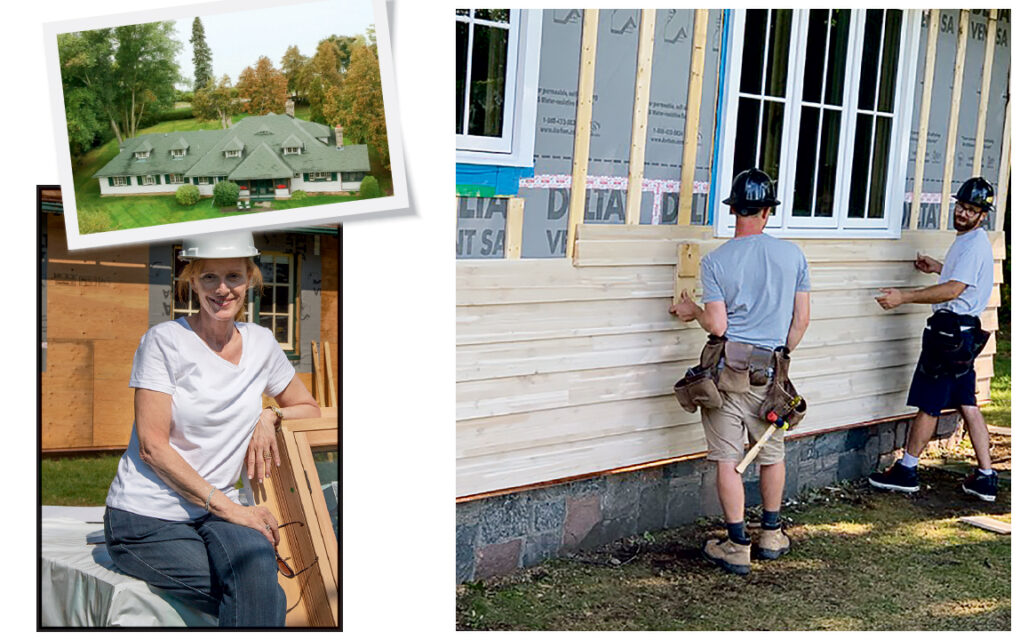
This is exactly what we did to build up those walls and get to the R26.4 rating necessary: One layer of R14 Rockwool insulation; then a layer of 2 ½-inch Rockwool Comfortboard; then ¾-inch plywood; then Delta-Vent SA, vapour permeable, self-adhering, air- and water-resistant barrier; then ¾-inch wood strapping; then beautiful planks of western red cedar siding. Between the walls and floors, we used Rockwool Safe’n’Sound fire and sound insulation. Under the house, in the crawl space, under the roof in the attic and on the new foundation walls, we used 2 lb. R31 spray foam insulation.
The next problem would be where to put the actual heating equipment, i.e. furnaces, air handlers, air-conditioning units and hot water tanks… no basement, remember. The solution was to build a mechanical room under the old “laundry porch.” The new underground room would be topped by a new all-season, mudroom–laundry room addition.
It was a brilliant solution, and watching the excavation of the new addition, the pouring of the foundations and the construction was our weekend entertainment from May until early August. Our general contractor, Ray Ambraska, and our team lead, Rik Ambraska, have led our trades to motor through a most difficult season for any construction.
In fact, since no one was going anywhere this summer, we wanted to hang out and watch from time to time. The solution for where to stay was to renovate the bunkie, including the bathroom. Cheap and cheerful, except wouldn’t it get awfully hot in there with only a couple of tiny windows? That would be addressed by our HVAC plan and by Carrier, the company that advised us on the equipment we would need, including a ductless, through-the-wall AC unit in the bunkie. I’ve worked in that bunkie laying on my bed when it’s been at least 90 degrees outside. I LOVE the whisper-quiet AC unit, my mini bar fridge, new shower and Nespresso machine. Enough said.
The insulating is almost done. Fortunately, the hardest part, which required the spray foam crew to crawl under the house, was scheduled before the extreme heat set in.
For the design team, the biggest challenge of winterizing is the need to have everything that goes into those walls finalized before the house can be inspected and sealed up. Yes, that means sconce heights, wall-mounted faucets and the AV system wiring and plumbing, too.
Candace Thompson, who produced our CAD drawings, has been extremely patient. But now we have it! Version 16 of our electrical plan has all the sconces correctly located. Why, I wonder, have I “oversconced” this house anyway? More on that next time….
It’s the beginning of September as I write this. Nathan Crichton, our HVAC lead, has just shown me our mechanical room. It’s a thing of beauty! Our heating system uses hot water to heat four Carrier Infinity, Variable Speed Top Tier Fan Coil units, located in four zones of the house, including the attic. Cooling is supplied by Carrier Variable Speed, Top Tier Air Conditioners. An Infinity Ductless Mini-Split Cooling System heats and cools the bunkie. For a better understanding of the system and how it works, please watch the video in our Lakehouse series.
The windows and doors are almost all in, and our beautiful western red cedar siding is going up now. All the insulation is complete and, one of these days, those boilers will actually fire up and the sweet feel of heat will come out through the shiny new ducts. People keep asking me when it will be done. “There will be a turkey” is my answer.
First, I thought it would be for Canadian Thanksgiving or maybe a U.S. bird in November… and now we’re hoping that a Christmas turkey will christen our new range. That’s my Christmas wish, in case you’re listening, Santa! Who ever thought “winterizing” could be so fascinating?
Next month, windows, floors and, soon… a kitchen!!
- Designer Lynda Reeves