

Recipe
August 2, 2023
Dany Pizza
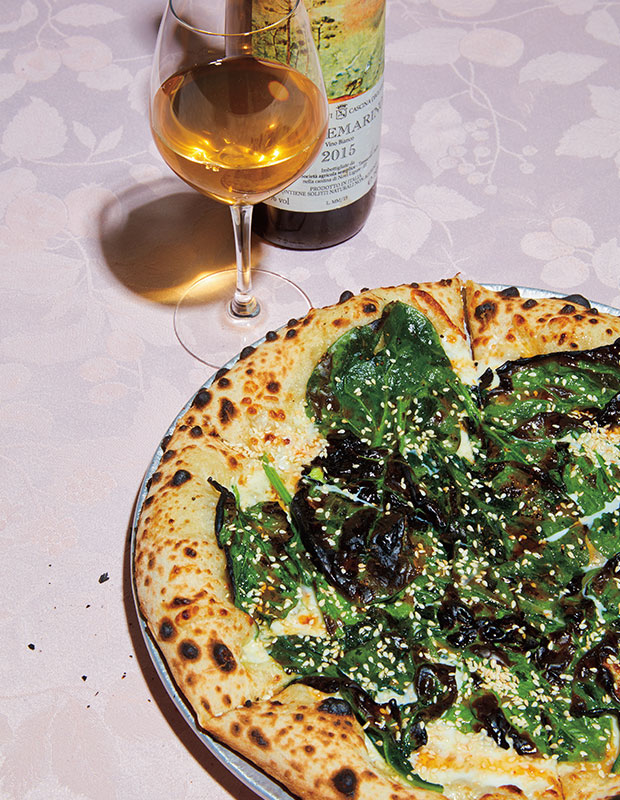
 “If you grew up or partied in Montreal anytime between 1998 and 2014, there’s a good chance you ended up eating a slice at Pizza Dany on de la Montagne. It was also the place we used to go to after we finished working long nights at Nora Gray. Steph and our friend Nick Rosati (who now co-owns Crèmerie Dalla Rose and Cafè A Posto) would go there all the time on their way back to the Plateau and would joke about getting pulled over for “overeating and driving” as they wolfed down greasy slices of spinach pizza with sesame seeds. Being able to make our version of Dany’s famous spinach pizza is our way to still indulge and reminisce about those years now that our partying days are behind us.” – Salad Pizza Wine
Directions
Yield: Makes 10-inch pizza
Make Sourdough Starter
- Day 1: In a container with a lid (a mason jar or a plastic container work fine), combine ¼ cup all-purpose flour with ½ cup very warm water (86°F–95°F) and mix, making sure to leave a few inches at the top for the starter to expand. Place the container somewhere warm (a turned-off oven with the light on works well).
- Day 2: After 24 hours, the mixture should be bubbling and sour, meaning the fermentation process has started. If it hasn’t, wait another 12 hours and check again. Add ¼ cup all-purpose flour and mix to combine. Return the jar to its cozy spot.
- Day 3: The starter should now be bubbling more and have gained in volume due to fermentation. Discard all but roughly 2 tbsp of the starter mixture and add ¼ cup flour of your choice and ¼ cup warm water (about 75°F–82°F). This is your daily starter feed.
- Happily ever after: The fermentation should be stable after day 3 and your starter should now smell like yogurt and have peaked in volume. To test it, flick 1 tsp starter in a bowl of warm water. If it floats, it’s ready. You can now feed your starter daily with wheat or rye flour, discarding all but roughly 2 tbsp of starter mix and adding your starter feed (¼ cup flour of your choice and ¼ cup warm water). After several feedings, you’ll start to notice your starter rise and fall throughout the day—this is normal.
- If you’re baking regularly, your starter should be fed daily, stored in a sealed container and kept between 68°F and 86°F. If you’re not baking regularly, your starter can be stored in the fridge with- out feeding for up to 30 days. When you’re ready to use it again, take it out of the fridge and repeat each step starting from day 3. It should be ready to use the next day. Keep in mind that the more mature a starter is, the more sourness will be exhibited in the final product. A healthy starter will keep for years.
Make Neapolitan Pizza Dough
- Hydrate flours: Bakers refer to this step as autolyze—it basically allows flour and water to create loose structure before we incorporate sourdough starter. If using stand mixer: In bowl of stand mixer fitted with hook attachment, add water first [1], followed by flours [2]. Mix on low until fully combined, about 4 minutes at lowest speed [3]. Turn mixer off and let dough rest in bowl for 20 minutes. If mixing by hand: In large bowl, add water first [5], followed by flours [6]. Mix until fully combined, about 8 minutes—use rubber spatula at first and then your hands once dough starts coming together [7]. Let dough rest in bowl for 20 minutes.
- Mix or knead dough: Add sourdough starter and salt and continue to mix on same speed or knead dough until it is supple and homogeneous, about 9–12 minutes [4, 8].
- Fold dough and let rise: Lightly oil inside of large airtight container. Transfer dough to container and, beginning with edge farthest away from you, grab dough from underneath and fold it up and toward you. (This motion should be done confidently to stretch dough without ever tearing it.) Now, rotate container 90 degrees and repeat same process until dough has been folded on itself for total of four times. Cover dough and rest at room temperature for 30 minutes. Repeat folding process two more times, resting dough 30 minutes at end of each folding session.
- Divide dough: Transfer dough to lightly floured surface and, using dough scraper, divide into four even pieces. Lightly oil and flour inside of same container if you have enough space for it in your fridge. Alternatively, you can use four smaller containers, one for each dough ball. Using separate containers will allow you to work with only one dough ball at a time, which will make it easier when it comes time to cook your pizzas.
- Shape dough into balls: Watch out for this next step—surface with too much or too little flour can make shaping balls difficult. You want to put just enough flour for there to be some stickiness to help shape ball, but not so much that ball will just slip around table. If you notice dough is sticking to your hands too much as you are shaping ball, bury your hands in flour for a moment instead of adding more to dough or work surface. Working with one dough portion at a time, fold each corner toward center of ball. Place dough seam side down on table and, applying moderate pressure, gently press your hand on dough, moving it in circular motion until you have smooth ball. A well-shaped ball should be evenly round and taut, with no tears or large air bubbles. Overworking dough during this step can cause it to tear, but don’t worry if this happens—simply set it aside and let it rest for a few minutes while you work on next ball. After a few minutes, you will be able to repeat process and form a nice smooth ball [6]. Place each shaped ball, seam side down, on oiled and floured baking sheet or in container. Cover or seal and chill in fridge for 2 days.
Make Spicy Honey
- Make spicy honey: In small pot over medium-high heat, bring to a boil enough water to cover 8 oz. jar. In small bowl, whisk together ground Espelette pepper, salt and 1 1/2 tbsp water. In another small pot (not the one with boiling water), combine honey and salty Espelette pepper water. Cook over low heat until honey is warm and fluid, below 105°F, about 1–2 minutes.
- Pack spicy honey: Pour warm honey directly into clean 8 oz. mason jar and close tightly. Take boiling water off heat and gently submerge closed mason jar into water. Allow to steep until water has completely cooled down. Honey will keep in jar at room temperature for several months.
Make Dany Pizza
- Transfer dough onto peel: Flour pizza peel, then shake gently to remove any excess flour. There should be enough flour on peel so that your pizza can move around freely without sticking, but not so much that it bakes into bottom of crust, making it mealy and floury. Using your hands, gently transfer stretched dough onto pizza peel, making sure it retains its round shape.
- Prepare toppings: In medium bowl, whisk together minced garlic and olive oil. Add spinach, salt and pepper and toss until spinach leaves are well coated in garlic oil. Set aside.
- Top pizza: Break buffalo mozzarella into small pieces with your fingers and disperse evenly over pizza, leaving 1½ inches of uncovered dough around edges for crust. Add low-moisture mozzarella in similar fashion. Place dressed spinach over cheese in one even layer and sprinkle whole pie with sesame seeds.
- Build pizza: Once sauce and cheese go on, there is no turning back, so make sure your oven and stone are nice and hot. Sauce and top pizza following recipe, always making sure to leave 1½ inches of uncovered dough around edges for the crust. Remember to apply only light pressure to avoid poking holes in dough as you are doing this.
- Bake pizza: Take peel (or other transfer tool) and insert it into oven at slight angle until you reach back of pizza stone. Give peel a little shake to allow pizza to start sliding off it—it should look like you are draping the pizza from back of the stone to front. Bake pizza for 8–10 minutes, until center has set and crust has formed nice golden and blistered bubbles. Note that every home oven heats a little differently. You may want to experiment with switching to a broil setting for last couple of minutes of cooking to mimic doming effect of wood-fire oven and achieve leopard-like charred pattern. The more you use your oven to make pizza at home, the more you’ll be able to nail the perfect cooking time and technique. (If you don’t have a pizza stone, you can bake your pizza directly on inverted baking sheet for first 8 minutes, then finish cooking it directly on the rack until dough is nice and crisp.)
- Rest pizza: Once you are satisfied with bake of pizza, use peel to remove from oven (or use tongs to grab edge of pizza) and transfer it onto cooling rack. Let it rest for 1 minute.
- Finish pizza and serve: Transfer pizza to cutting board or pizza pan. Add any finishing touches, cut into six slices and serve. Drizzle cut pizza with spicy honey, close your eyes and imagine it’s 4 a.m. Enjoy!
Dominique Lafond
Excerpted from Salad Pizza Wine by Janice Tiefenbach, Stephanie Mercier Voyer, Ryan Gray and Marley Sniatowsky. © 2023 Janice Tiefenbach, Stephanie Mercier Voyer, Ryan Gray, and Marley Sniatowsky. Photographs by Dominique Lafond. Published by Appetite by Random House®, a division of Penguin Random House Canada Limited. Reproduced by arrangement with the Publisher. All rights reserved