Decorating & Design
Shooting The Cover: Q&A With Photographer Patrick Biller
Updated on June 3, 2020

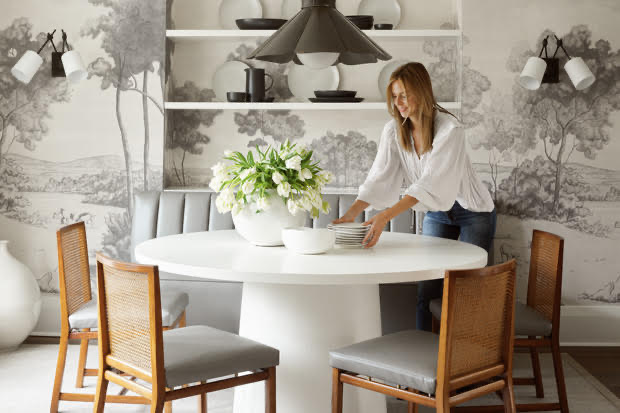
Although it’s true that we love every one of our magazine cover images, June 2020’s dining room is particularly dreamy. We asked Toronto photographer Patrick Biller to share his process for creating this beautiful cover shot (with interior design by Allison Willson). Plus, he’s got tips and tricks for taking and editing great interior images at home using only your smartphone!
House & Home: Did you know right away that this dining room would make a great magazine cover image?
Patrick Biller: Yes! From a design perspective, this room really spoke to me as a potential cover. It’s a masterful mix of traditional and contemporary design: the wallpaper, as a grounding, classical element, is combined with clean, modern moments, like the custom table and banquette seating. It’s young and fresh and, immediately, I knew Allison had created a beautiful vignette. Also, if I’m going for a cover try, there are things I look for beyond great design content. The rooms that work best have breathing room. For example, is there space at the top of the image for the magazine masthead? Sometimes, I’ll shoot with more of the ceiling in the frame to allow for that, and I also look for space elsewhere within the image that might work for the magazine’s cover lines.
H&H: Why did you decide to include Allison in the shot?
PB: There are a couple of ways to tell the story of a room through photography: one is from the point of view of design and the other is meant to illustrate lifestyle. It’s always best to shoot the room both with a person and without to give the editorial team options. Ask yourself if the shot is purely about design content and, if it is, it’s best to shoot it without a human element. If you feel the room is calling for lifestyle, then shoot it again with the designer, homeowner, or even a pet.
H&H: How important are composition and propping?
PB: For interiors, you can shoot wide, a vignette or a detail. For this dining room, I shot a vignette, which can help draw the viewer into the room, unlike wide shots, which tend to feel like you’re on the outside looking in. Prop styling is about storytelling, and it’s somewhat subjective; really, it’s about balance. When a stylist assesses a room for photography, it will either require more or less. In this case, we wanted to have Allison setting the table. With her, the plates and bowls make more sense to the viewer. Think about the story you’re trying to tell, and then use styling elements and props to further that narrative.
H&H: Did you have to use a lot of lighting?
PB: Interestingly, many interiors photographers, myself included, rarely use artificial lighting. I shoot with natural light whenever possible and turn off any overhead lights or lamps to avoid the distraction of mixed lighting. Ideal lighting, in my opinion, comes from the side as opposed to directly behind or in front of the camera — this is what adds dimension and allows you to feel the depth of a room. On the day we shot this photo, the light coming through the window on the left was soft and diffused. We were going for a light and airy feel to accentuate the room’s neutral tones. I positioned Allison on the right, facing toward the window so that she would be lit without casting unwanted shadows.
H&H: Is it possible to shoot a cover-worthy photo on your smartphone?
PB: Yes, especially if you’re posting it on a social media platform. A lot of people don’t realize that you can adjust focus and brightness from within your phone’s camera app. For iPhone users, try tapping on the screen in your photo app. A sun icon will appear, then slowly swipe up or down to adjust the brightness. You can also tap on the part of the image you want in sharp focus. It’s important to get your vertical lines as straight as possible, and there are quick editing tools that can help to straighten them out. In Instagram, for example, when you’re uploading a photo to share, tap “edit” at the bottom, then tap “adjust” and play around with the perspective until the lines in your room match the lines in the guidelines.
H&H: How about photo editing? Do you have to be a professional photographer to get it right?
PB: Photo editing apps are an amateur photographer’s best friend. My favorite is VSCO. It’s a free-to-download app for iPhone and Android, and it’s easy to navigate. My favorite filter is “S2,” but try to find your own unique style. And if you subscribe to VSCO, you get all the filters for $20 per year, which you won’t regret! When I edit a phone photo on the go, these are my go-to adjustments: I correct the perspective and crop, pop on a filter, increase contrast, decrease saturation and increase clarity or sharpness. A camera can only do so much — it’s in the editing where your photos come to life. Don’t be afraid to play around and make mistakes; the only way to learn photography is by doing it. Luckily, your interiors won’t judge you, so what have you got to lose?
Patrick Biller
Sally Armstrong
Allison Willson


