Recipe

October 19, 2014

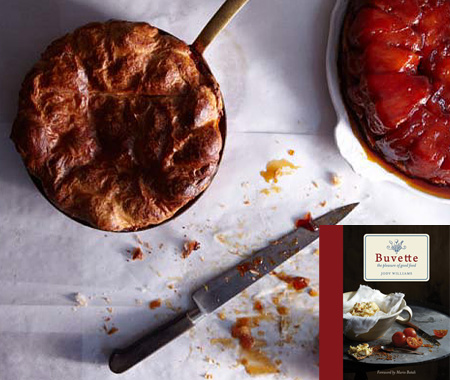
Buvette’s Tarte Tatin Recipe

Recipe:

Step 1: Preheat the oven to 425°F. Line a baking sheet with aluminum foil.

Step 2: Pour the sugar into a heavy, ovenproof 8″ skillet and place over medium heat. Give the pan one quick shake so that the sugar is in an even layer. Let the heat and the sugar do the work. It needs no stirring or swirling until the sugar caramelizes, about 8 minutes. Do not walk away while the caramel is forming because it can burn very quickly! When the caramel is dark amber in colour, immediately turn off the burner and remove the skillet from the heat. If you do not have a heavy, 8″ skillet, you can make the caramel in a small pot and then pour it in an even layer into an 8″ or 10″ cake pan and go from there.

Step 3: Once the caramel has cooled down a bit (it doesn’t have to be room temperature, but you don’t want it to be boiling hot), arrange the apples in the skillet by placing each one on its side and snugly tucking each consecutive one as closely together as possible to form tight, concentric circles. Really pack in the apples and pile any extras on top. It will seem like too many, but they will shrink as they cook and release a lot of liquid. Cover the apples tightly with aluminum foil, being sure to seal the edges. This will hold in the steam, which will help the apples to cook evenly and thoroughly.

Step 4: Place the skillet on the foil-covered baking sheet (to catch any juice that might come out) and bake in the oven until the apples are wonderfully soft and collapsed, about 1 hour. Remove the skillet from the oven and discard the foil.

Step 5: Rearrange the apples, if necessary, as some may have shrunk. (See Caramel Glaze directions below.) Set the pan over high heat and cook until the juices are completely reduced and sticky and, when you shake the pan, all of the apples start to move as a single layer, just 3 or 4 minutes. Be careful not to burn the apples and the caramel.

Step 6: Once the juices have reduced, remove the skillet from the heat and carefully place the puff pastry over the apples, trimming it so it fits the skillet. Place the skillet back on the baking sheet, return it to the oven, and bake until the puff pastry is really nicely browned, 35 to 45 minutes.

Step 7: Remove the tart from the oven and let it rest for 10 minutes.

Step 8: Place a large plate over the puff pastry and very carefully invert the tart, being very cautious not to burn yourself (caramel is hot, dangerous stuff). Let the skillet sit, upside down, over the plate for a minute or two so that gravity begins to do its job, and the apples release from the bottom of the pan. Without shaking the pan, slowly lift it up and away as the tart remains on the plate. If a few of the apples stick to the pan, simply help them out with a spoon — no big deal and no one will know!

Step 9: Cut the tarte Tatin into slices and serve hot, or at room temperature, with plenty of crème fraîche and caramel glaze (see below), if you like.

Caramel Glaze

Step 1: If you don’t mind an extra step and a small pot to wash, you can easily make a shiny, thick glaze to cover the tarte Tatin. When you take the apples out of the oven after they’ve cooked, instead of reducing the liquid on the stovetop, carefully pour the liquid off into a small saucepan, being sure not to disrupt your apple arrangement. The easiest way to do this is to cover the pan with a pot lid and tip the pan into the saucepan so that the lid catches any apples that threaten to escape.

Step 2: Cover the drained apples with the pastry and tuck it into the oven as instructed.

Step 3: Meanwhile, boil the strained liquid until it is dark golden brown and quite thick and set it aside. Once you’ve inverted your tarte Tatin, use a spoon to evenly cover the apples with the glaze.

Reprinted with permission from Jody Williams’ Buvette (2014 Grand Central Publishing).

Ingredients

1/2 cup sugar
9 apples peeled, halved and cored
1 sheet prepared puff pastry (usually 7 to 9 oz.)
Crème fraîche, for serving
Caramel glaze (optional)

Directions

Yield:

Step 1: Preheat the oven to 425°F. Line a baking sheet with aluminum foil.

Step 2: Pour the sugar into a heavy, ovenproof 8″ skillet and place over medium heat. Give the pan one quick shake so that the sugar is in an even layer. Let the heat and the sugar do the work. It needs no stirring or swirling until the sugar caramelizes, about 8 minutes. Do not walk away while the caramel is forming because it can burn very quickly! When the caramel is dark amber in colour, immediately turn off the burner and remove the skillet from the heat. If you do not have a heavy, 8″ skillet, you can make the caramel in a small pot and then pour it in an even layer into an 8″ or 10″ cake pan and go from there.

Step 3: Once the caramel has cooled down a bit (it doesn’t have to be room temperature, but you don’t want it to be boiling hot), arrange the apples in the skillet by placing each one on its side and snugly tucking each consecutive one as closely together as possible to form tight, concentric circles. Really pack in the apples and pile any extras on top. It will seem like too many, but they will shrink as they cook and release a lot of liquid. Cover the apples tightly with aluminum foil, being sure to seal the edges. This will hold in the steam, which will help the apples to cook evenly and thoroughly.

Step 4: Place the skillet on the foil-covered baking sheet (to catch any juice that might come out) and bake in the oven until the apples are wonderfully soft and collapsed, about 1 hour. Remove the skillet from the oven and discard the foil.

Step 5: Rearrange the apples, if necessary, as some may have shrunk. (See Caramel Glaze directions below.) Set the pan over high heat and cook until the juices are completely reduced and sticky and, when you shake the pan, all of the apples start to move as a single layer, just 3 or 4 minutes. Be careful not to burn the apples and the caramel.

Step 6: Once the juices have reduced, remove the skillet from the heat and carefully place the puff pastry over the apples, trimming it so it fits the skillet. Place the skillet back on the baking sheet, return it to the oven, and bake until the puff pastry is really nicely browned, 35 to 45 minutes.

Step 7: Remove the tart from the oven and let it rest for 10 minutes.

Step 8: Place a large plate over the puff pastry and very carefully invert the tart, being very cautious not to burn yourself (caramel is hot, dangerous stuff). Let the skillet sit, upside down, over the plate for a minute or two so that gravity begins to do its job, and the apples release from the bottom of the pan. Without shaking the pan, slowly lift it up and away as the tart remains on the plate. If a few of the apples stick to the pan, simply help them out with a spoon — no big deal and no one will know!

Step 9: Cut the tarte Tatin into slices and serve hot, or at room temperature, with plenty of crème fraîche and caramel glaze (see below), if you like.

Caramel Glaze

Step 1: If you don’t mind an extra step and a small pot to wash, you can easily make a shiny, thick glaze to cover the tarte Tatin. When you take the apples out of the oven after they’ve cooked, instead of reducing the liquid on the stovetop, carefully pour the liquid off into a small saucepan, being sure not to disrupt your apple arrangement. The easiest way to do this is to cover the pan with a pot lid and tip the pan into the saucepan so that the lid catches any apples that threaten to escape.

Step 2: Cover the drained apples with the pastry and tuck it into the oven as instructed.

Step 3: Meanwhile, boil the strained liquid until it is dark golden brown and quite thick and set it aside. Once you’ve inverted your tarte Tatin, use a spoon to evenly cover the apples with the glaze.

Reprinted with permission from Jody Williams’ Buvette (2014 Grand Central Publishing).

[img_assist|nid=2809701|title=|desc=|link=url|url=http://houseandhome.com/food/menus/recipes-buvette|align=middle|width=225|height=269]